- Importing Cases into WinFlex Web from
Your Desktop
1. On your dashboard, under Shortcuts, click Illustrations.
2. Click Manage Cases.
- NOTE: You will not see any saved cases until you upload some cases from your desktop or create and save cases using WinFlex Web.
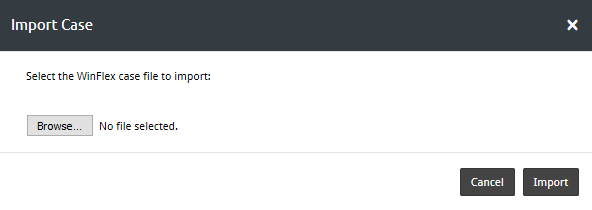
 4. Click Browse to locate the file on your computer.
5. Select the case file and click Open.
6. Click Import.
Case file requirements:
- Must be a valid WinFlex case file (.wfc)
- Must contain 100 clients or less.
- Only 1 case can be uploaded at a time.
NOTE: If you upload a case with the same name as one of your existing WinFlex Web cases, the characters _wf# will be appended to the end of the case name. For example: Sample Case_wf1, Sample Case_wf2.
- Exporting Cases from the WinFlex Web
to Your Desktop
1. On your dashboard, under Shortcuts, click Illustrations.
2. Click Manage Cases.
3. In the left column, click the name of a specific case to narrow down the list, or click All Cases.
4. In the list, check the box next to each client you want to include in the exported file.
5. Click the Tools menu and select Export Case File.
6. When prompted, save the .zip file to a location on your computer. - Deleting a Case
1. On your dashboard, under Shortcuts, click Illustrations.
2. Click Manage Cases.
3. In the left column, click the name of a specific case to narrow down the list, or click All Cases.
4. In the list, check the box next to each client case you want to delete.
5. Click Delete at the top of the case list. - Editing a Case
1. On your dashboard, under Shortcuts, click Illustrations.
2. Click Manage Cases.
3. In the left column, click the name of a specific case to narrow down the list, or click All Cases.
4. In the list, check the box next to the client case you want to edit.
5. Click Edit at the top of the case list.
6. In the left menu, click the case to open it.
7. Make your changes, and then click the Save button in the left menu to save your changes.

- Assigning a Case to a Group
Assigning a case to a group gives all group members access to the case. A case can be shared with only one group at a time. To share a case with a different group, use the Save As option in WinFlex Web.
NOTE: Before you can assign a case to a group, you must create or join a group. See Creating a Group for more information.
1. On your dashboard, under Shortcuts, click Illustrations.
2. Click Manage Cases.
3. In the left column, click the name of a specific case to narrow down the list, or click All Cases.
4. In the list, check the box next to each client case you want to assign to a group.
5. Click Assign Group at the top of the case list.
6. Select a group from the drop-down list, and then click Assign . - Removing a Case from a Group
1. On your dashboard, under Shortcuts, click Illustrations.
2. Click Manage Cases.
3. In the left column, click the name of a specific case to narrow down the list, or click All Cases.
4. In the list, check the box next to each client case you want to assign to a group.
5. Click Assign Group at the top of the case list.
6. Select another group or None from the drop-down list, and then click Assign.
NOTE: Selecting None reassigns the case to the original owner. If you are not the original owner, the case will no longer appear on your case list.
 button in the last column.
 .
. .
. .
. .
.